Thursday, July 4

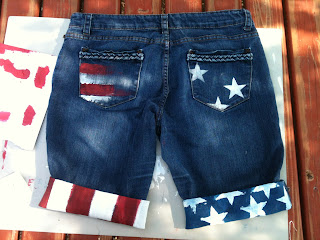
Independence Day DIY Shorts

       Happy Independence Day all! I hope you all enjoy the festivities- whatever they may be.  Tonight its all bonfire and fireworks for me, and I'm sure looking forward to it!
       So, to get into the spirit of things, I DIY-ed a pair of shorts, creating an adorable and easy tutorial on getting into the all-American spirit.  The DIY only takes an hour or so, and needs the following supplies:
  • Red, White, and Blue acrylic fabric paint
  • Paint Brush
  • Painter's Tape  (I just lined up cardstock on my edges due to the lack of tape)
  • Card Stock
  • Star Stencil
  • One Pair of Shorts or Cut-Offs
  • Sand Paper or Cheese Grater (totally optional)
       So for starters, take those shorts/cut-offs and flip them inside out, slipping a piece of cardstock into the pant legs.
 
       After you've done that, tape out the areas where you want to paint your red stripes, let dry, then paint the white strips.  While they're drying, paint the other pant leg blue, let dry, then use your stencil to paint white stars on top of the blue.  *NOTE: be cautious with how much white paint is on the brush when you begin to fill in the stencil, the paint does tend to bleed.  The front part of the shorts should look like this:
 
 
       Now, flip your shorts over and do the same thing on the other side.  Let it dry completely.  Once they're dry, you may notice that you have this thick, hard coating of paint in certain areas.  This part is where the sand paper or cheese grater comes in.  Take your cheese grater or sandpaper and rub down those areas, giving your jeans a warn, faded look.
       Turn your shorts inside-out, and detail the back pockets.


       As you see here, I took the ends of my jeans and folded them up.  This gives you the option of showing however much of the stars and stripes you desire.  Wash them once, and there you go! Perfect for either the wonderful 4th of July, or the Americana fad that's sweeping the West Coast!


       I hope you enjoy them as much as I do! Good luck!!
 
P.S. Get creative, you can do this with ANY theme- try it out and share your results :)


Sunday, June 30

DIY Fail- Braided Neckline

       Well it's a lovely, extremely hot Sunday evening, and I'm finally back from vacationing along the coast of California.  After exploring the West-Coast and seeing all the brilliant trends going around, I decided to try a few inspired DIY projects, some of which I'll be doing this week, and one which I've already done.
       All of the Pinterest DIY people may've already seen this adorable picture, but I decided I'd just attach it anyway:
 
       The Pin is titled: Banana Republic Braided Top DIY (I think, anyway)
       So I figured, hey, I have a Hanes shirt that I can sacrifice, why not?  Well, that should've been my red flag right there.  I followed the instructions, cut slits with scissors, and used the loop-through-loop technique (which in actuality took me forever to figure out, ridiculous, I know).  I tried on the top afterward and found the neckline was smaller than it originally was, and it had a weird bunched look to it.  I took the braid out, and cut bigger slits, then looped it all again.  There wasn't a weird bunched look, but the braided look had holes every here and there, which exposed A LOT of skin. An uncomfortable amount. 
       If anyone were to have all DIY's possible and guaranteed to work, they'd have to be extremely lucky and talented :) This is one of my DIY's that will be thrown in my bag of scrap fabric and never tried again.  Really. 
       I'll leave it to Banana Republic next time!
 
P.S.  If you try this and it works for you, I'd love to hear your input!

Saturday, May 25

Rhinestone & Ball-Chain Wrap Bracelet

  Well, today was absolutely gorgeous, with warm-enough weather.  Which I must say is fantastic!
  For the past few days, I wore this adorable little bracelet, and it's so much fun.  The bracelet consists of a small ball-chain (enough to wrap three times around my wrist), a decent amount of embroidery floss, and a rhinestone chain (long enough to wrap around my wrist once).  As always, my trusty super glue, wire cutters, and scissors were part of my main supplies.
 
(I forgot to take off my hair-tie, so don't get confused!)

  So, if your interested in making one of these little bracelets, here are some basic instructions:
1) measure three pieces of embroidery floss (just a little longer than your rhinestone chain) and braid them together, knotting both ends.
2) cut ANOTHER piece of embroidery floss (twice as long as your braid) and tie it to one of the knots.
3) wrap the piece of embroidery floss around the braid and in-between each rhinestone.  Finish wrapping entire length of braid and rhinestone chain together.
4) glue both ends of the braid and string to the ends of the rhinestone chain.  Let dry, cut off excess.
5) use the connecting ends of the rhinestone chain to fasten the colorful-rhinestone chain to your ball-chain. 
6) wrap around your wrist three times, and add those cute friend ship bracelets!

  Good luck!  I hope you'll enjoy it as much as I do!

Wednesday, May 22

The Friendship Bracelts

  Well, today its a decent 70 degree's outside, and I'm inside.  Let me justify; it's overcast and windy.  I'm a little cold. 
  So, after spending a decent amount of time on Pinterest (both today and yesterday) I sat down with all the supplies to make some of those adorable friendship bracelets.  With Embroidery Floss, Buttons, a couple Chain Bracelets, Scissors, and my trusty Super-Glue; I was set.  After maybe half an hour, I figured out the importance of using lengthy Embroider Floss.  So what did I do?  I started again on a different bracelet.  Then another, then another, and probably a few more.  After learning how to make friendship bracelets when I was twelve, I never really forgot how, but it's been quite a while.  So I dug around for old bracelets and found half a dozen.  SCORE!  That's when I decided to be finished, with my cramped fingers and more bracelets than I thought I had. 
  Here are my two cents:  Long enough string, and tight knots!

  With friendship bracelets and their huge popularity, it's so nice to know how to make them.  There are plenty of Youtube videos and diagrams on the World-Wide-Web for anybody.  Good Luck!

~Big thanks to Christine Gierer for her super helpful videos!  She has PLENTY of these fabulous friendship bracelet tutorials, and does a great job at howtomakejewelry.com